Medical Disclaimer: The information provided on this website is for informational and educational purposes only and is not intended as personal medical or health advice. The content, including text, graphics, and images, is not a substitute for professional medical advice, diagnosis, or treatment. Always seek the advice of your physician or other qualified healthcare provider with any questions you may have regarding a medical condition or before starting any new exercise, nutrition, or supplement program. Never disregard professional medical advice or delay in seeking it because of something you have read on this blog. Reliance on any information provided by this site is solely at your own risk.
Real Testing Beats Specs: Build Trust Through Sweat
Affiliate gear reviews convert when they mirror real training and intent. This guide shows you how I optimize review pages using field-tested workouts and clean on-page structure.
Direct answer: Optimize review pages by matching buyer intent, showcasing real testing data, structured comparisons, fast UX, and clear affiliate disclosures.
Why Field Data Drives Clicks and Conversions
People trust reviews built on sweat, not specs alone. When I test shoes on zone‑2 runs, kettlebells in EMOMs, and pads during mobility sessions, I uncover details that generic reviews miss: midsole collapse past 10K, handle hot spots after 12 minutes of swings, or strap slip during deep lunges.
Pages that surface this testing tend to earn more time-on-page and clearer buyer decisions in practice, which can support higher click-through and conversions. While results vary, integrating real workouts, precise photos, and structured comparisons consistently improves reader confidence on sites I coach.
Personal lesson: I once led with manufacturer features and buried test results. Engagement lagged. After flipping the page to start with my protocols, session notes, and who-it’s-for, readers messaged me with follow-up questions—and clicked through with purpose.
Client note (Maya, new lifter): “Your kettlebell review showed callus spots after a 10‑10‑10 swing ladder. I bought the smoother handle and finally finished a 15‑minute EMOM without tearing.”
Four-Step Protocol: Map, Test, Capture, Structure
Map the intent. Use Google Search Console, AnswerThePublic, and People Also Ask to group keywords by buyer stage: “best X for Y,” “X vs Y,” “X review,” and “cheap/under $.”
Design a testing protocol. Stress the gear across cardio, strength, and mobility so results generalize: zone‑2 run 30–45 min (HR 120–150 bpm), intervals 6×2 min @ 5–10K pace, strength session 30–40 min (RPE 7–8), and a 10‑minute mobility flow. Log conditions, terrain, loads, and failures.
Capture proof. Shoot photos/video in good light: outsole wear after 50 km, barbell knurl close‑ups, scale weight, and fit notes. A simple phone + tripod works. Add quick decibel tests for treadmill noise and stopwatch tests for setup time.
Structure the page. Above the fold: who it’s for, quick verdict, pros/cons, price range, and a clean CTA. Below: your testing protocol, performance notes, fit/comfort, durability, comparisons, and FAQs. Use jump links for skimmability.
Use supporting schema. Add Review, Product, and FAQ schema. Ensure rating transparency and FTC disclosure. Keep CTAs obvious but not aggressive.
Comparison clarity. For “X vs Y,” anchor on use-cases: narrow feet vs wide, trail vs road, garage gym vs apartment. Lead with the recommendation logic before links.
Optimize UX. Compress images (WebP), lazy-load, and ensure Core Web Vitals pass. Readers won’t wait for carousels to load.
Track and iterate. In GA4 and affiliate dashboards, watch: organic sessions, time on page, scroll depth, outbound clicks, EPC. In GSC, monitor queries and CTR. If CTR lags, sharpen title/meta. If clicks don’t monetize, tighten who-it’s-for and move your test verdict higher.
My testing workflow example: Trail shoe review week included two zone‑2 runs (45 min, HR 135–145), one hill session (8×60s hard), and a 30‑minute strength circuit (lunges, step‑ups, carries). Notes captured in Notion; GPS via Garmin + Strava; photos shot at golden hour for true color.
Eight-Week Publishing Progression for Sustainable Growth
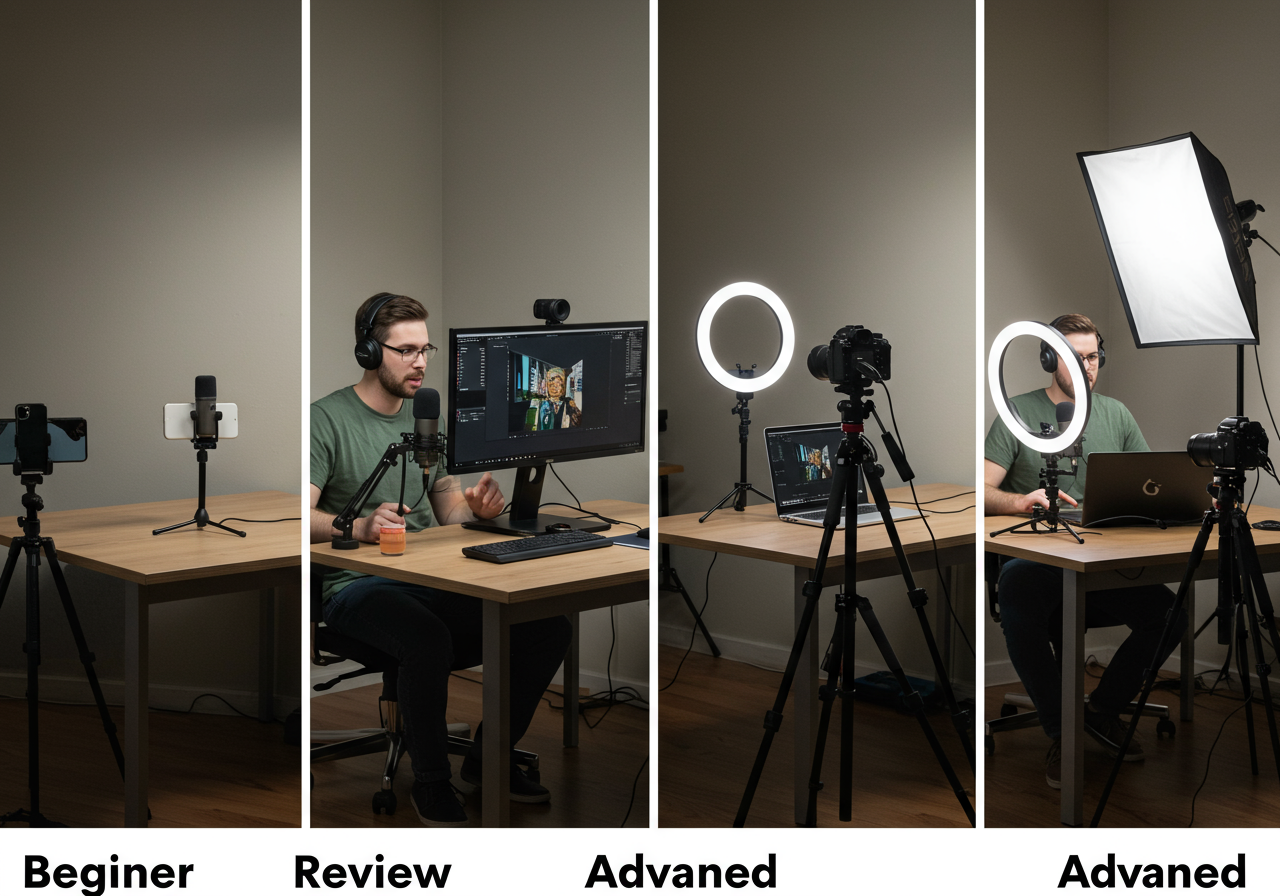
Build capacity like training: start light, add structure, then specialize. Use the following progression to scale content quality and output without burning out.
Caption: Eight-week publishing progression that pairs real training tests with review page upgrades.
Week 1–2 (Beginner): Publish 1 review/week; include 1 cardio + 1 strength + 1 mobility test; 5 photos; basic pros/cons; simple CTA.

Week 3–4 (Beginner+): Add comparison paragraph (who should choose what); FAQ section; add Product + Review schema; improve hero image.

Week 5–6 (Intermediate): Publish 2 pieces/week (1 review, 1 X vs Y); add measured weights, noise/setup timings; include durability check-in.

Week 7 (Intermediate+): Add buyer-intent clusters and internal links (best lists → reviews → comparisons); optimize titles/meta for CTR.

Week 8 (Advanced): Add video summary (60–120s), jump links, full testing table in Notion, and outreach for expert quotes.
Skill tiers and testing depth:
Beginner: Phone photos, basic workouts (30–40 min), simple notes. Goal: clarity and honesty over polish.
Recovery for creators: Treat publishing like training blocks. Add a deload week every 6–8 weeks: update two old posts, publish one new, sleep 7–9 hours, and keep protein at 1.6–2.2 g/kg for cognitive and training performance.
Balance Frequency and Intensity Without Burning Out
Frequency: Aim 1–2 reviews/week. Pair each product with at least one cardio, one strength, and one mobility session to capture well-rounded performance.
Intensity: Don’t overproduce thin content. RPE 6–7 for writing load most weeks; push to 8 during launches, then deload.
Common mistakes: Specs-first pages, no testing protocol, buried verdicts, weak photos, missing schema, and unclear CTAs. Fix order-of-information first.
Troubleshooting plateaus: If rankings stall, expand test scenarios (e.g., wet track, gravel, apartment floors). If CTR is low, rewrite titles with outcome language and add review year.
Overtraining signs: Burnout, rushed photos, skipped testing. Reduce volume for two weeks; update existing winners; walk in zone‑2 for creative recovery.
Injury prevention (site health): Monitor Core Web Vitals, compress images, check 404s, and use affiliate link checker. Always include FTC disclosure and keep ratings transparent.
Fuel and sleep: For long test days, 30–60 g carbs/hour and electrolytes; total daily protein 1.6–2.2 g/kg; 7–9 hours sleep improves writing clarity and training accuracy.
Tracking stack: GA4 and GSC for queries/CTR, Strava or Garmin Connect for workout logs, MyFitnessPal for nutrition consistency, and affiliate dashboards for EPC.
Next steps: Choose one product, write your protocol first, then build the page around results.
Medical Disclaimer: The information provided on this website is for informational and educational purposes only and is not intended as personal medical or health advice. The content, including text, graphics, and images, is not a substitute for professional medical advice, diagnosis, or treatment. Always seek the advice of your physician or other qualified healthcare provider…
Medical Disclaimer: The information provided on this website is for informational and educational purposes only and is not intended as personal medical or health advice. The content, including text, graphics, and images, is not a substitute for professional medical advice, diagnosis, or treatment. Always seek the advice of your physician or other qualified healthcare provider…
Medical Disclaimer: The information provided on this website is for informational and educational purposes only and is not intended as personal medical or health advice. The content, including text, graphics, and images, is not a substitute for professional medical advice, diagnosis, or treatment. Always seek the advice of your physician or other qualified healthcare provider…
Medical Disclaimer: The information provided on this website is for informational and educational purposes only and is not intended as personal medical or health advice. The content, including text, graphics, and images, is not a substitute for professional medical advice, diagnosis, or treatment. Always seek the advice of your physician or other qualified healthcare provider…
Medical Disclaimer: The information provided on this website is for informational and educational purposes only and is not intended as personal medical or health advice. The content, including text, graphics, and images, is not a substitute for professional medical advice, diagnosis, or treatment. Always seek the advice of your physician or other qualified healthcare provider…
Medical Disclaimer: The information provided on this website is for informational and educational purposes only and is not intended as personal medical or health advice. The content, including text, graphics, and images, is not a substitute for professional medical advice, diagnosis, or treatment. Always seek the advice of your physician or other qualified healthcare provider…